Uaxactun Vols. 5.2 – 5.3
Eric von Euw and Ian Graham. 1984 Peabody Museum Press
Ian Graham. 1986 Peabody Museum Press
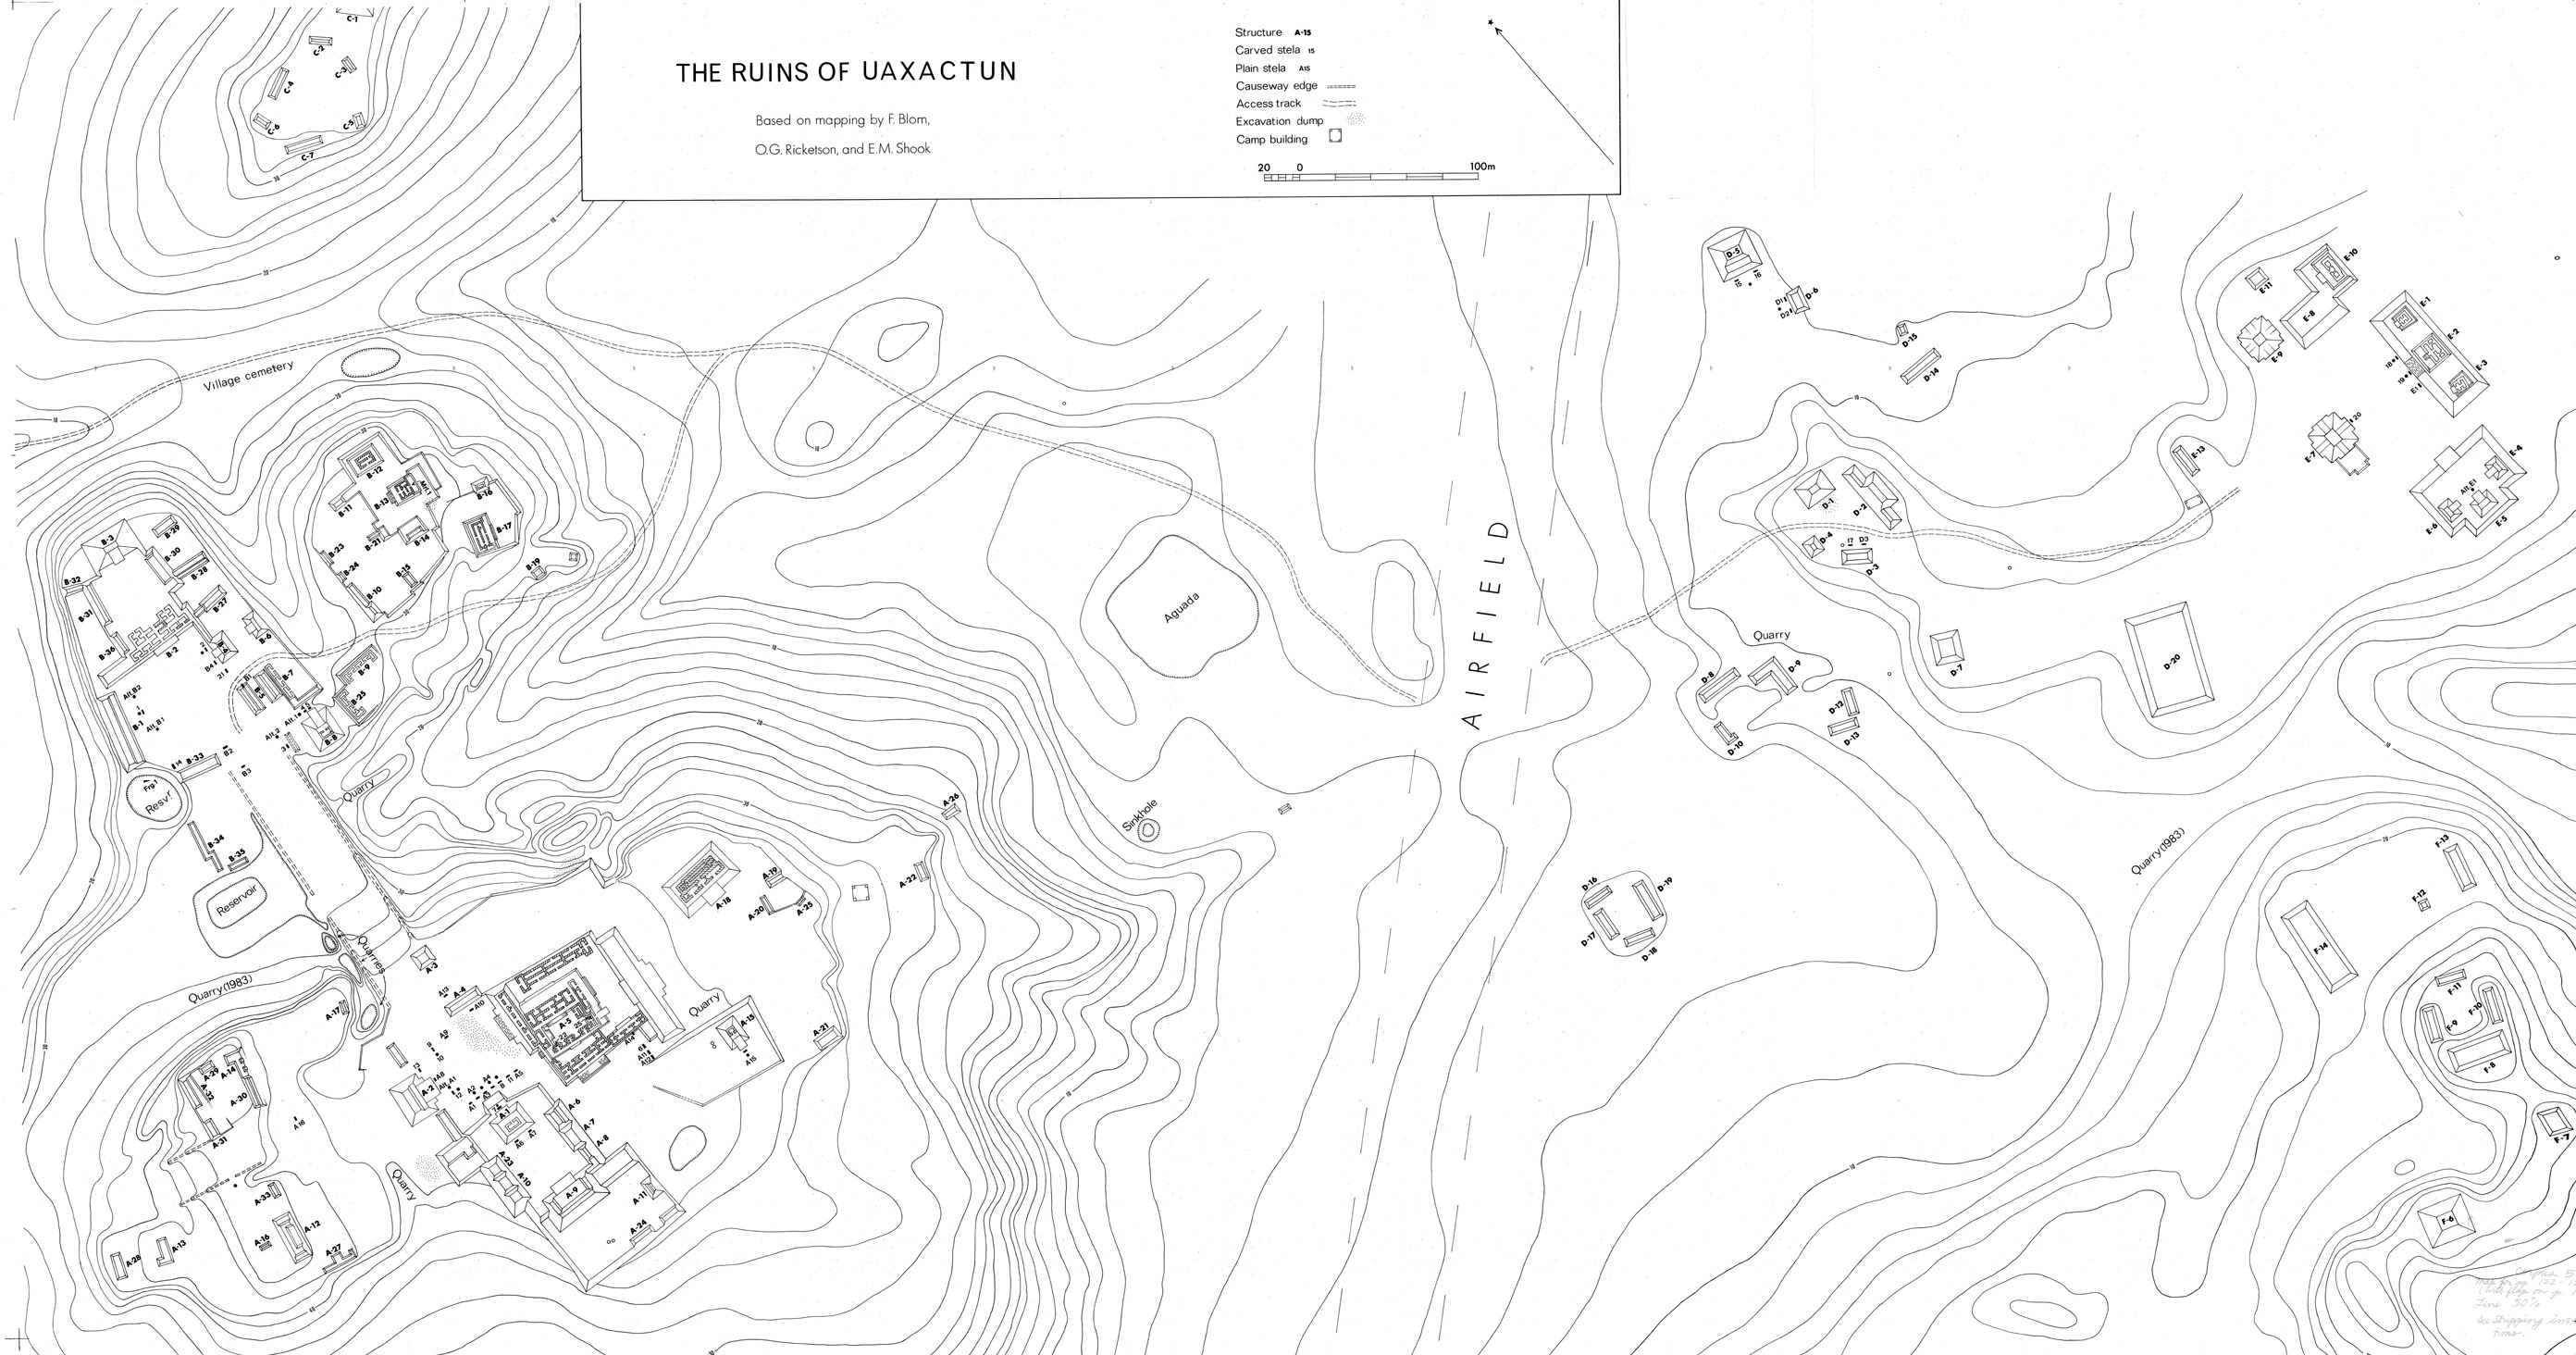
Uaxactun lies near the foot of an extensive belt of contorted karst terrain, which runs through north-central Peten in an arc bulging toward the southeast. In places, the edge of this hilly region forms a steep escarpment overlooking large areas of bajo; some 50 km west of Uaxactun the escarpment becomes a precipice along the foot of which runs the nascent Rio San Pedro.
Near Uaxactun, a seasonal stream comes out of the hills to pursue a rather ill-defined course along the foot of the hills, tending a little east of north, later becoming a tributary of the Rio Azul. Uaxactun thus stands near the watershed between the Gulf of Mexico and the Caribbean.
Groups A, B, and C of the ruins were constructed on a ridge that rises to a maximum height of about 40 m above the plain. Other groups occupy less elevated ground some 800 m to the southeast. Low ground in between has been cleared as an airfield, on both sides of which a village has grown up. The aguada which supplies much of the water for the village (as it must have in antiquity) lies at the foot of the slope up to Group A. This aguada, however, has been known to dry out completely, most recently in 1978.
During the Carnegie Institution's many seasons of work at the site, the staff used to ride in with mule trains from El Cayo, a four-days' journey; El Cayo, in what was then British Honduras, was reached by motorboat from Belize, ascending the river of the same name.
Air service to Uaxactun, established in the late 1930s with Trimotors for the purpose of bringing out chicle, largely supplanted other means of reaching Uaxactun for the next forty years, until a road from Flores was driven through to Tikal, with a track suitable for four-wheel-drive vehicles opened up from there to Uaxactun. This track was greatly improved by grading in 1984. Another road now leads from Flores via San Andres, EI Zotz, and Santa Cruz; though hardly more than a logging road, it provides an alternative route to Uaxactun now that air service to the village has ceased. This road continues past Uaxactun to Dos Lagunas.
On the 1:500 000 map of the Central Lowlands area, published at the end of Volume 3 of this series, a site is shown to the east of Uaxactun with the name Ramonalito. At the time of my visit to those ruins in 1978, I was unaware that a note by A. Ledyard Smith on the same site, under the name El Paraiso, had been published in Ricketson and Ricketson (1937, pp. 295, 296). The latter name has therefore been used in the accompanying map of the area.


Location
This stela, found by the Carnegie Institution expedition of 1916, was set in front of Structure B-1, the placement of its altar on its west side suggesting that the stela faced away from the mound.
Condition
The butt remains in situ, its north side revealed by a CIW pit. The shaft broke about 0.30 m above the plaza floor, but any carving below the line of the break on the face toward the altar has been lost through fracture and crumbling. A horizontal line perceptible on the north side may represent the bottom of the inscription on that side.
All that is left of the shaft are five decayed fragments. Three were found with carving still preserved on their narrow sides, and photographs of two were reproduced by Morley (1937-38, vol. 5, pI. 65c and d), captioned as, respectively, the left and right sides; in his text, however, Morley did not venture to attribute the other, more eroded fragments (not examined by me) to one side or the other (1937-38, vol. 1, p. 209). The first fragment does show faint traces of carving on the face that would be the front if, as Morley supposed, the surviving inscription was on the left side.
Material
Limestone of poor quality.
Shape
Unknown.
Carved Areas
Only the north side, for certain (see above).
Photographs
First fragment: Graham. Other fragments: Morley.
Drawing
Graham.
Dimensions
Butt:
Ht | 1.40 m |
MW | 1.40 m approx. |
MTh | 0.67m |
First fragment: | |
Ht | 1.30 m |
MW | 1.00 m |
MTh | 0.59 m (reduced |
by flaking) | |
Rel | 1.5cm |

Location
The altar lies on the west side of the stela, about one meter away from it.
Condition
Unbroken but badly eroded.
Material
Limestone.
Shape
Approximately circular.
Carved Area
Upper surface carved in intaglio rilevato with glyph cartouches arranged in a circle.
Photograph
Graham.
Dimensions
Max. dia. 1.83m MTh 0.35 m


Location
Although cracked through at the base, this stela was standing when found (it has since fallen back against the mound). It was set in front of Structure B-4, a few meters to the north of the plain Stela B4 on the east side of the main plaza of Group B.
Condition
Broken near the base of carving. The left side no longer shows any vestige of an inscription, and the front is badly eroded, but the right side is much better preserved.
Material
Limestone.
Shape
Tapers from the bottom towards the rounded top.
Carved Areas
Front and right side, and probably left side too,
Photographs
Front and left side: CIW in 1921. Right side: Graham.
Drawing
Graham, based on a field drawing corrected by artificial light.
Dimensions
HLC | 2.13 m | |
PB | 0.09 m approx. | |
MW | 1.10 m | |
WBC | 1.10 m approx. | |
MTh | 0.55 m | |
Rel | 4.5 | cm |


Location
This stela was found fallen on the west side of Structure B-8. The main portion lay on its face 12 m out from the mound; a fragment that could scarcely have come from this stela lay 6 m farther west; another fragment lay 8 m to the north. This last was designated Altar 2 by Blom (1924, p. 35). On opposite sides of the periphery of Altar 2 are single vertical lines; these suggested to me the possibility that the altar had been reworked from the missing lower fragment of Stela 3, the lines having once formed the lower margins of glyph panels on the sides of the stela. On turning the altar in 1978 I found carving on the underside that seemed to confirm the supposition.
Condition
The main portion is fairly well preserved on all three sculptured sides, erosion of the surfaces having been rather uniform. The carving on the front of the lower fragment naturally suffered damage at the original breakage, and then during reworking into an altar.
Material
Fine-grained limestone.
Shape
Sides bulge somewhat; rounding of top is irregular. Front surface is somewhat convex, the back unevenly dressed. Shape of butt is unknown (trimmed for reuse).
Carved Areas
Front and both sides.
Photographs
Graham.
Drawings
Graham, based on field drawings corrected by artificial light.
Dimensions
HLC | 2.75 m approx. | |
PB | 0.39 m plus | |
MW | 1.13 m | |
WBC | 1.05 m | |
MTh | 0.53 m | |
Rel | 2.1 | cm |


Location
When found, the surviving portion of this stela was standing in situ on the north side of Structure B-8 between Stela 5 and Altar 1. After excavating its setting, the CIW left the fragment buried in the trench.
Condition
The upper half or third is now missing. The front surface is rather badly weathered, but with patches of detail preserved; the back is in better condition over about half its surface.
Material
Limestone.
Shape
Original shape is beyond determination. Butt is asymmetrical and comes to a blunt point.
Carved Areas
Front carved in relief, back in intaglio rilevato.
Photographs
Front: CIW. Back: Graham.
Drawings
Graham. That of the front based on a photograph only; that of the back based on a field drawing corrected by artificial light.
Dimensions
HLC | 0.98 m plus | |
PB | 0.78 m | |
MW | 0.92 m | |
WBC | 0.78 m | |
MTh | 0.36 m | |
Rel | 0.5 | cm (back; |
front not recorded) | ||


Location
This stela stands on the north side of Structure B-8, about 2 m east of Stela 4.
Condition
The shaft is unbroken. The front is moderately weathered, and the sides are more so, with more serious consequences in view of the inscription's shallow relief. The fissure extending deep into the stone on the left side probably existed in the shaft when quarried. The back is in very poor condition, all of its original surface having scaled away except on the right side near the bottom where debris afforded some protection. (Note added 3/31/2023: There are indications of legs and feet of a left-facing figure on the back; it was not drawn by Graham due to its eroded condition.)
Material
Limestone.
Shape
Tapers irregularly towards the top in width, also in thickness, although this may be due partly to erosion. The butt is rounded.
Carved Areas
Front and back carved in relief, sides incised.
Photographs
Graham.
Drawings
Graham. That of the front based on a field drawing corrected by artificial light; those of the sides based on photographs taken after the glyphs had been emphasized with water-soluble pigment applied under artificial light.
Dimensions
HLC | 1.83 m | |
PB | 0.40 m approx. | |
MW | 1.21 m | |
WBC | 1.21 m | |
MTh | 0.64 m | |
Rel | 4.5 | cm |


Location
This stela was found standing south of Structure A-5 and is the stela second nearest it in a line of four extending toward the terrace of Structure A-1S. The lower 0.50 m or so of sculpture was then below ground level. In 1978, the stela was lying in a trench excavated by the CIW.
Condition
In one piece when discovered, it was evidently cracked through and has since broken in two. The carved surfaces are quite badly eroded. A considerable imperfection or loss in the upper left-hand area may he original; so also would seem to be the rough area on the right side.
Material
Limestone.
Shape
Parallel sides with rounded top. Butt is roughly squared off.
Photographs
Graham.
Carved Areas
Front and both sides.
Drawing
Graham, based on field drawings corrected by artificial light.
Remarks
Morley's sketch shows vestiges of glyph cartouches, which he labeled A2 and B1. I can see no evidence that they existed, therefore, his glyphs A3, A4, 82, 83, and 84 are renumbered here as A2, A3, 81, 82, and 83.
Dimensions
HLC | 2.12 m | |
PB | 0.68 m | |
MW | 0.84 m | |
WBC | 0.83 m | |
MTh | 0.60 m | |
Rel | 2.0 | cm |


Location
This stela was found by Morley in 1916 on the north side of Structure A-I. The butt, broken off at ground level, remained in situ between the mound and the stairway leading up to it. In 1924 BJorn found ten carved fragments, which he labeled a to j. Only one of them, g, lay near the butt; the others were found lying in the plaza near the foot of the stairway. In 1978 only two of these fragments, band g, could be located, but another fragment, k, was identified and found to fit onto g. By 1985 fragment II had disappeared.
Condition
More than half of the carved surface of the stela has been eroded, reduced to rubble, or was never found.
The upper portion, however, survived to be photogmphed in near-pristine condition. Morley states that the back, although badly damaged, appeared to be plain.
Material
Fine-grained limestone.
Shape
Rounded top, with sides apparently parallel.
Carved Areas
Front and sides.
Photographs
Fragments a and c, constituting the surviving right side of the stela: Morley. Other fragments: Graham.
Drawings
Principal line drawings: Graham, based on field drawings and on Morley's photographs. Watercolor sketches of fragments e and f are reproduced from Blom's manuscript at the same scale as the photographs.
Dimensions
Ht | 1.15 m (top 3 frag- |
ments) | |
PB | unknown |
MW | 0.86 m |
WBC | unknown |
MTh | 0.45 m |
Rel | 5.7 cm |

Location
This was the central stela in a row of seven stelae ranged along the south side of the main plaza of Group A, in front of Structure A-I. When discovered by Morley in 1916, the stela lay uprooted and broken. By 1978 none of the constituent fragments could be found.
Condition
Morley's photographs Seem to show five or six principal fragments. Three of them were fitting fragments and showed the legs and feet of the figure, fairly well preserved. The central right-hand portion of lhe shaft was missing, and the upper and left-hand portions of the front no longer bore recognizable Iraces of sculpture. The left side, though essentially complete, was so badly eroded and riven by breaks that the number of glyph-blocks it bore is uncertain (perhaps eight), and the few visible details lack context. The beginning and end of the inscription on the right side were badly eroded.
Material
Limestone.
Shape
Unknown.
Carved Areas
Front and sides.
Photographs
Morley, 1922.
Dimensions
HLC | 2.06m |
PB | 0.38m |
MW | 0.76 m |
WBC | unknown |
MTh | 0.41 m |
Rel | unknown |


Location
This stela, discovered by Morley in 1916, stood facing west in the main plaza of Group A, some 12 m to the northeast of the northeast corner of Structure A-2. CIW workers later lowered it to the ground to permit examination of its setting.
Condition
Unbroken, but in some areas badly weathered. The bottom row of hieroglyphs on the back appears to have been left unfinished.
Material
A hard limestone breccia.
Shape
Irregular. The front surface was clearly uneven before being carved, whereas the back was fairly flat.
Photographs
Graham.
Carved Areas
Front and back.
Drawings
Graham, based on field drawings corrected by artificial light.
Dimensions
HLC | 2.54 m (front) |
2.04 m (back) | |
PB | 1.25 m |
MW | 1.15 m |
WBC | 1.15 m |
MTh | 0.65m |
Rel | 6.0 cm approx. |


Location
This stela was discovered in 1916, lying in the main plaza of Group A, close to Stela 9. The discovery of the latter (the first known Baktun 8 stela) diverted attention from its altar. Not until 1922 was the altar seen not only to be carved, but to have been originally a stela which was later cut down to serve as an altar. According to Morley (1937-38, vol. 1, p. 176), it lay "behind Stela 9 (northeast of it) facing the glyph side of the stela." A. L. Smith's account (in Ricketson and Ricketson 1937, p. 160) and the CIW site plans show it lying beside the stela, to the south. The side then facing up is now referred to as the front.
Condition
Broken into three pieces, both faces being unevenly and seriously eroded. The inscriptions on the sides, executed in shallow incisions and much reduced by the trimming on the shaft, have noticeably deteriorated since discovery.
Material
Limestone of somewhat coarse grain.
Shape
The altar retains a section of the erstwhile stela's straight parallel sides, trimmed above and below into semicircular outline.
Carved Areas
Front and back carved in relief, sides in broad incised lines, any finer incised lines now being obliterated.
Photographs
Graham.
Dimensions
HLC | 1.10 m (front) |
1.17 m (back) | |
PB | 0.28 m (front) |
0.21 m (back) | |
MW | 1.08 m |
MTh | 0.30 m |
Rel | 3.0 cm |


Location
The stela was found by CIW workers in 1916, still standing and partly embedded in the side of a tree. It had been set up in front of Structure A-2, some 8 m south of the centerline of the stairway.
Condition
Unbroken and moderately weathered.
Material
White limestone of porous and uneven texture.
Shape
Front surface uneven. Sides roughly hewn but approximately parallel. Top flat with chamfered corners.
Carved Areas
Front only.
Photograph
Graham.
Drawing
Graham, based on a field drawing corrected by artificial light.
Dimensions
HLC | 1.41 m |
PB | 0.68 m |
MW | O.77m |
WBC | 0.72 m |
MTh | 0.35 m |
Rel | 1.0 cm |


Location
This stela was discovered by ClW workers in 1922, lying close to the northeast corner of Structure A-2, face upward and partly covered by debris fallen from the mound.
Condition
The left-hand edge and top have suffered damage, presumably from falling masonry; fortunately the only fragment broken off that carried carved design was recovered. The upper portion of the stela, having been longest protected from erosion by debris, is least eroded. The lower portion is severely pitted.
Material
Limestone of fine gmin.
Shape
The front surface is flat, and the undamaged side is smoothly dressed to give the shaft parallel sides, which curve inward toward the top to give a rounded tip.
Carved Areas
Front only.
Photograph
Morley, 1922.
Drawing
Graham, based on a field drawing corrected by artificial light.
Dimensions
HLC | 2.32 m |
PB | 0.85 m |
MW | 0.85 m |
WBC | 0.84 m |
MTh | 0.54 m |
Rel | 1.0 cm |


Location
The fragments of this stela were found in 1921, lying in the southwest corner of the main plaza of Group B, just north of Structure B-33. Because the butt had been uprooted, the predse setting of the stela is unknown.
Condition
The stela must have been broken into several pieces, of which five now survive. Blom saw a sixth, of which he made the sketch reproduced here at the same scale as the other drawings. The large upper fragment was lying face upward and is badly eroded on both the front and the left side. The three fitting fragments are quite well preserved.
Material
Limestone.
Shape
Narrows from the middle toward both bottom and top. The top is more or less rounded. Front and back seem to be fairly flat. The butt becomes 10 cm thicker 10 cm below the lowest carving.
Dimensions
HLC | 3.00 m approx. |
PB | 0.63 m plus |
MW | 1.05 m |
WBC | unknown |
MTh | 0.50 m |
Rel | 3.0 cm |

Location
This stela was discovered by Morley in 1916. It is the westernmost of two stelae standing in front of Structure D-S, a small temple located at the northern extremity of Group D.
Condition
More than half of the stela must have disappeared, probably through crumbling. Only a few traces of design remain on front or back.
Material
Limestone of poor quality.
Shape
Unknown.
Carved Areas
Front carved in relief, back with two columns of intaglio glyphs.
Photograph
Morley, 1922.
Dimensions
HLC | 0.56 m plus |
PB | 0.96 m |
MW | O.84m |
MTh | O.36m |
Rel | not recorded |


Location
When discovered by Morley in 1916, the stela was standing in front of Structure D-5, a small temple at the northern extremity of Group D. Stela 15 stood alongside Stela 16 to the west. (Both stelae were later lowered to the ground to permit examination of their settings.)
Condition
The shaft is unbroken, the carving badly eroded on both sides.
Material
Limestone.
Shape
From the front, the shaft tapers gracefully to a parabolic top; the outline of the back is more parallel-sided. The butt is asymmetrical and blunt.
Carved Areas
Front carved in low relief, back in intaglio rilevata.
Photographs
Front: Graham.
Back: Morley, 1922. Stereophotos: Graham.
Drawing
Graham, based on stereophotos.
Dimensions
HLC | 1.68 m |
PB | O.93m |
MW | O.95m |
WBC | 0.95m |
MTh | O.55m |
Rel | 3.0 cm |


Location
When discovered in 1916, the stela stood in the small central plaza of Group D, close in front of Structure D-3. The carved side of this stela faced the mound, for which reason it was initially reported as uncarved. A plain stela stands alongside it to the southeast. While examining the setting of the stela, A. L. Smith found the lidded entrance to an empty chultun beneath a plaster floor very dose to the stela on its northwest side.
Condition
The shaft is intact. Weathering of the surface in some areas has been severe, in others less damaging because uniform and without pitting.
Material
Limestone of uneven quality, being hard and fine-textured in parts.
Shape
Irregular in outline, and having a front surface that was poorly dressed prior to carving. The sides, though smoothly finished, are likewise undulant.
Carved Areas
Front (southwest face) only, unless weathering has obliterated all traces of carving on the opposite face.
Photographs
Graham.
Drawing
Graham, based on a field drawing corrected by artificial light. Position of base of carving is unclear.
Dimensions
HI | 3.62 m |
MW | 1.12 m |
MTh | 0.49 m |
Rel | 1.5 cm approx. |


Location
The stela was standing in the plaza of Group E when that group was discovered in 1922. Stela 18 is the northernmost of three stelae on the west side of Structure E-2.
Condition
The shaft is unbroken. The front is severely weathered, with the formation of many deep pits. The back also is pitted, but the more even erosion on that side has been less disfiguring.
Material
Limestone, geologically fractured and recemented.
Shape
The shaft tapers from the base upward, coming to a roughly parabolic top. The front face is broader than the back, and the bull is squared off.
Carved Areas
Front and back only.
Photographs
Graham.
Drawing
Graham, based on a field drawing corrected by artificial light.
Dimensions
HLC | 2.48 m (front) |
2.00 m (back) | |
PB | 0.89 m (front) |
MW | 1.19m |
WBe | 1.14 m (front) |
0.95 m (back) | |
MTh | 0.77 m |
Rei | 6.0 cm |


Location
When discovered by Morley or one of his co-workers in 1922, the lower part of the stela was in situ, forming the central member of a group of three erected at the foot of the mound supporting Structure E-2. Instead of facing due west toward Structure E-7, the stela was turned nlmost toward the northwest, this setting later being shown by excavation to be original.
Condition
Broken into four pieces. Front and back have suffered considerable erosion; there are also losses of portions of the carved surface of the front due to fracturing. The middle fragments, present in 1978, could not be found in 1985.
Material
Limestone, hard but uneven in texture.
Shape
Asymmetrical, coming to an off axis point; butt squarish.
Photographs
Front: Graham. Back: top and bottom fragments, Graham; two middle fragments, Morley.
Drawings
Graham, based on field drawings corrected by artificial light.
Dimensions
HLC | 2.25 m approx. |
PB | 1.20 m approx. |
MW | 1.51 m |
WBC | 1.51 m |
MTh | 0.52 m |
Rel | 3.0 cm |


Location
This stela was discovered in 1922 by Morley and his co-workers. It was standing, as it still does, at the foot of the cast stairway of Structure E-7.
Condition
lntact. The front is moderately well preserved, but at some time since 1922 when the CIW photographs were taken, a lamina of stone from the lower left-hand area split off and was lost; on this was carved the captive on that side. Much of the back has been obliterated by weathering and blows from falling masonry. The inscription at the top of the right side appears not to have been completed.
Material
Limestone.
Shape
The shaft is of nearly uniform width but is markedly convex on the left side and concave on the right. The butt is squared off.
Dimensions
HLC | 2.50m |
PB | 0.50 m approx. |
MW | 1.23 m |
WBC | 1.23 m |
MTh | O.50m |
Rel | 4.5 cm |


Location
When found in 1916, the stela was standing on the south side of Structure B-4, facing the plaza of Group B, and was classified as uncarved. When A. L. Smith investigated the setting of the stela thirteen years later, he found the butt to bear the remains of a carved design.
Condition
Unbroken. The buried remnant of carving is quite well preserved. It is clear that the rest of the carved design on that face was purposely obliterated; the hardness of the stone precludes the possibility of total erosion. The other three sides seem to have been plain from the start.
Material
A hard limestone.
Shape
The shaft was carefully dressed, with slightly bulging sides. The irregular outline of the top may be due to erosion.
Carved Areas
Front only.
Photograph
Graham.
Drawing
Graham.
Dimensions
HLC | 2.75m |
PB | 0.32m |
MW | 1.20 m |
WBC | 1.12m |
MTh | 0.44 m |
Rel | 0.3 cm |


Drawing of Uaxactun, Stela 22, left (2004.15.6.13.38) and right (2004.15.6.13.39)


Location
A. L. Smith found this stela standing against the back wall of the inner chamber of a two-chamber shrine built along the south side of the central court of Structure A-5, looking outward, that is to the south. The stela was later removed from its setting to permit excavation.
Condition
The shaft is intact. Collapse of the shrine's roof at an early date may be inferred from the poor condition of the front of the stela. The sides remained in better condition. Since excavation, the front has deteriorated further.
Material
Limestone.
Shape
The face of the stela is not quite plane, but recedes slightly near the top and has a low area at about one quarter of its total height. From the front the sides are essentially parallel until they converge asymmetrically toward the flat top. The sides themselves are somewhat convex, and the columns of glyphs on them undulate, conforming to the curvature of the front. The back is roughly hewn and bulges outward with a humpback.
Carved Areas
Front and both sides.
Photographs
Front: entire shaft, Graham. Partial view of front: Morley. Sides: Graham.
Drawings
Graham.
Dimensions
HLC | 2.16m |
PB | 0.43 m |
MW | 0.93m |
WBC | 0.90m |
MTh | 0.40 m |
Rel | 2.5 cm |